Advanced examples
In this section we’ll show several examples of usage of the byteparsing package for dealing with files combining ASCII and binary data.
Parsing PPM files
To show how we can mix ASCII and binary data, we have an example where we parse Portable PixMap files (PPM). These files have a small ASCII header and the image itself in binary. The header looks something like this:
P6   # this marks the file type in the Netpbm family
640 480
256
<<binary rgb values: 3*w*h bytes>>
[1]:
import numpy as np
from dataclasses import dataclass
from byteparsing import parse_bytes
from byteparsing.parsers import (
    text_literal, integer, eol, named_sequence, sequence, construct,
    tokenize, item, array,  fmap, text_end_by, optional)
The PPM header format allows for comments in the ASCII header.
[2]:
comment = sequence(text_literal("#"), text_end_by("\n"))
We define a class that should contain all the data in the header.
[3]:
@dataclass
class Header:
    width: int
    height: int
    maxint: int
Then we can construct a parser for this header, using named_sequence and construct.
[4]:
header = named_sequence(
    _1 = tokenize(text_literal("P6")),
    _2 = optional(comment),
    width = tokenize(integer),
    height = tokenize(integer),
    maxint = tokenize(integer)) >> construct(Header)
We’ll have to pass on the header information to the parser for the binary blob somehow, so we define a function.
[5]:
def image_bytes(header: Header):
    shape = (header.height, header.width, 3)
    size = header.height * header.width * 3
    return array(np.uint8, size) >> fmap(lambda a: a.reshape(shape))

ppm_image = header >> image_bytes
Let’s test this on a sample image, and ignore the fact that PIL has a perfectly good parser for PPM files itself.
[6]:
raw_data = open("python-logo.ppm", "rb").read()
image = parse_bytes(ppm_image, raw_data)

from PIL import Image
Image.frombytes(mode="RGB", size=(image.shape[1], image.shape[0]), data=image)
[6]:

Parsing PLY files
PLY is a file format storing 3D polygonal data that has support for both ASCII and binary formats. Some references: Wikipedia entry and Paul Bourke’s pages. The specification of the PLY format is a bit vague and allows for liberal interpretation and custom user defined fields. We take a look at the example on Paul Bourke’s page:
ply
format ascii 1.0           { ascii/binary, format version number }
comment made by Greg Turk  { comments keyword specified, like all lines }
comment this file is a cube
element vertex 8           { define "vertex" element, 8 of them in file }
property float x           { vertex contains float "x" coordinate }
property float y           { y coordinate is also a vertex property }
property float z           { z coordinate, too }
element face 6             { there are 6 "face" elements in the file }
property list uchar int vertex_index { "vertex_indices" is a list of ints }
end_header                 { delimits the end of the header }
0 0 0                      { start of vertex list }
0 0 1
0 1 1
0 1 0
1 0 0
1 0 1
1 1 1
1 1 0
4 0 1 2 3                  { start of face list }
4 7 6 5 4
4 0 4 5 1
4 1 5 6 2
4 2 6 7 3
4 3 7 4 0
We see a header that is always ASCII encoded. The header specifies a list of elements, each containing a list of properties. The listed elements determine how to parse the data section of the PLY file. The data section maybe encoded in ASCII or binary.
[7]:
from __future__ import annotations
from typing import Optional
from dataclasses import dataclass
from functools import partial
import numpy as np
import pprint

from byteparsing import (parse_bytes, Parser, parser)
from byteparsing.parsers import (
    sequence, named_sequence, choice, optional, value, repeat_n,
    text_literal, char, text_one_of, text_end_by,
    byte_none_of, byte_one_of,
    flush, flush_decode,
    push, pop, char_pred,
    many, some, many_char, some_char, many_char_0, some_char_0,
    integer, scientific_number, array, binary_value,
    fmap, construct)

pp = pprint.PrettyPrinter(indent=2, width=80)
Header
The header starts with a “magic number”, a line containing ply.
[8]:
eol = choice(text_literal("\n"), text_literal("\n\r"))
ply_magic_number = sequence(text_literal("ply"), eol)
The second line indicates which variation of the PLY format this is. We will store header information in data classes and enums.
[9]:
from enum import Enum

class PlyFormat(Enum):
    ASCII = 1
    BINARY_LE = 2
    BINARY_BE = 3

    @staticmethod
    def from_string(format_str: str) -> PlyFormat:
        if format_str == "ascii":
            return PlyFormat.ASCII
        if format_str == "binary_little_endian":
            return PlyFormat.BINARY_LE
        if format_str == "binary_big_endian":
            return PlyFormat.BINARY_BE
        else:
            raise ValueError(f"Unrecognized format string: {s}")
Since each item in the header is seperated by a newline, we need a tokenize function that doesn’t skip newlines. From that we can define what we may consider to be a word in a PLY header. We flush the cursor, expect a ascii_alpha character (words don’t start with numbers) and then many characters that are letters, numbers or underscores. At the end we flush the cursor again, decoding to a Python string. We see here both many_char and many_char_0 being used:
many_char automatically flushes the cursor before and after which is not what we want when parsing a word. In fact, the only thing many_char_0 does, is to move the cursor end until the given parser no longer matches the input.
[10]:
ascii_alpha = char_pred(lambda c: 64 < c < 91 or 96 < c < 123)
ascii_num = char_pred(lambda c: 48 <= c < 58)
ascii_alpha_num = choice(ascii_alpha, ascii_num)
ascii_underscore = char(95)


def tokenize(p: Parser) -> Parser:
    return sequence(p >> push, many_char(text_one_of(" ")), pop())

word = sequence(
    flush(), ascii_alpha, many_char_0(choice(ascii_alpha_num, ascii_underscore)),
    flush_decode())
The format line specifies the used data encoding: one of ascii, binary_little_endian or binary_big_endian, and a version number. The version number is always “1.0”.
[11]:
ply_format = named_sequence(
    _1 = tokenize(text_literal("format")),
    format_str = tokenize(word),
    _2 = sequence(tokenize(text_literal("1.0")), eol)) \
>> construct(PlyFormat.from_string)
[12]:
parse_bytes(ply_format, b"format binary_little_endian 1.0\n")
[12]:
<PlyFormat.BINARY_LE: 2>
Comments may be placed in the header by using the word comment at the start of the line. Everything from there until the end of the line should then be ignored.
[13]:
ply_comment = sequence(
    tokenize(text_literal("comment")), flush(),
    text_end_by("\n") >> push, optional(char("\r")), pop())
Now we need a parser for a data type, and given a data type we need to be able to parse that data either in ASCII or binary. There are two classes of types: primitive types and list types.
[14]:
ply_type_table = {
    "char": "int8",
    "uchar": "uint8",
    "short": "int16",
    "ushort": "uint16",
    "int": "int32",
    "uint": "uint32",
    "float": "float32",
    "double": "float64"
}

class PlyType:
    pass

@dataclass
class PlyPrimitiveType(PlyType):
    dtype: np.dtype

    @staticmethod
    def from_string(s: str) -> PlyPrimitiveType:
        sanitized_name = ply_type_table.get(s, s)
        return PlyPrimitiveType(np.dtype(sanitized_name))

    @property
    def byte_size(self) -> int:
        return self.dtype.itemsize

    def ascii(self) -> Parser:
        return sequence(
            flush(), some_char_0(byte_none_of(b"\n ")),
            many_char_0(byte_one_of(b"\n ")), flush(self.dtype.type))

    def binary(self) -> Parser:
        return binary_value(self.dtype)

@dataclass
class PlyListType(PlyType):
    size_type: PlyPrimitiveType
    value_type: PlyPrimitiveType

    def ascii(self) -> Parser:
        return self.size_type.ascii() >> partial(repeat_n, self.value_type.ascii())

    def binary(self) -> Parser:
        return binary_value(self.size_type.dtype) >> partial(array, self.value_type.dtype)
[15]:
primitive_type = tokenize(word) >> fmap(PlyPrimitiveType.from_string)

list_type = named_sequence(
    _1=tokenize(text_literal("list")),
    size_type=primitive_type,
    value_type=primitive_type) >> construct(PlyListType)

ply_type = choice(list_type, primitive_type)
[16]:
parse_bytes(ply_type, b"float float")
[16]:
PlyPrimitiveType(dtype=dtype('float32'))
[17]:
pp.pprint(parse_bytes(ply_type, b"list uint8 float"))
PlyListType(size_type=PlyPrimitiveType(dtype=dtype('uint8')), value_type=PlyPrimitiveType(dtype=dtype('float32')))
[18]:
@dataclass
class PlyProperty:
    dtype: PlyType
    name: str

ply_property = named_sequence(
    _1=tokenize(text_literal("property")),
    dtype=ply_type,
    name=tokenize(word),
    _2=eol) >> construct(PlyProperty)
[19]:
parse_bytes(
    ply_property,
    b"property float x\n")
[19]:
PlyProperty(dtype=PlyPrimitiveType(dtype=dtype('float32')), name='x')
[20]:
end_header = sequence(text_literal("end_header"), eol)
[21]:
@dataclass
class PlyElement:
    name: str
    size: int
    properties: List[PlyProperty]

    def ascii(self) -> Parser:
        single_item = named_sequence(
            **{p.name: p.dtype.ascii() for p in self.properties})
        return repeat_n(single_item, self.size)

    @property
    def afine(self) -> bool:
        return all(isinstance(p.dtype, PlyPrimitiveType)
                   for p in self.properties)

    def binary(self) -> Parser:
        if self.afine:
            compound_type = [(p.name, p.dtype.dtype) for p in self.properties]
            return array(compound_type, self.size)
        else:
            single_item = named_sequence(
                **{p.name: p.dtype.binary() for p in self.properties})
            return repeat_n(single_item, self.size)


ply_element = named_sequence(
    _1=tokenize(text_literal("element")),
    name=tokenize(word),
    size=tokenize(integer),
    _2=eol,
    properties=some(ply_property)) >> construct(PlyElement)
[22]:
pp.pprint(
    parse_bytes(
        some(ply_element),
        b"element vertex 8\nproperty float x\nproperty float y\nproperty float z\n" +
        b"element face 6\nproperty list uchar int vertex_index\n"))
[ PlyElement(name='vertex', size=8, properties=[PlyProperty(dtype=PlyPrimitiveType(dtype=dtype('float32')), name='x'), PlyProperty(dtype=PlyPrimitiveType(dtype=dtype('float32')), name='y'), PlyProperty(dtype=PlyPrimitiveType(dtype=dtype('float32')), name='z')]),
  PlyElement(name='face', size=6, properties=[PlyProperty(dtype=PlyListType(size_type=PlyPrimitiveType(dtype=dtype('uint8')), value_type=PlyPrimitiveType(dtype=dtype('int32'))), name='vertex_index')])]
[23]:
pp.pprint(parse_bytes(ply_element, b"element face 6\nproperty list uchar int vertex_index\n"))
PlyElement(name='face', size=6, properties=[PlyProperty(dtype=PlyListType(size_type=PlyPrimitiveType(dtype=dtype('uint8')), value_type=PlyPrimitiveType(dtype=dtype('int32'))), name='vertex_index')])
[24]:
@dataclass
class PlyHeader:
    format: PlyFormat
    comment: List[str]
    elements: List[PlyElement]

    def parser(self) -> Parser:
        if self.format == PlyFormat.ASCII:
            return named_sequence(
                **{e.name: e.ascii() for e in self.elements})
        if self.format == PlyFormat.BINARY_LE:
            return named_sequence(
                **{e.name: e.binary() for e in self.elements})
        else:
            raise NotImplementedError()

ply_header = named_sequence(
    _1=ply_magic_number,
    format=ply_format,
    comment=many(ply_comment),
    elements=some(ply_element),
    _2=sequence(text_literal("end_header"), eol)) >> construct(PlyHeader)

def ply_data(header):
    return named_sequence(header=value(header), data=header.parser())

ply_file = ply_header >> ply_data
The following ASCII example is given on Paul Bourke’s page.
[25]:
ascii_example = b"""ply
format ascii 1.0
comment made by Greg Turk
comment this file is a cube
element vertex 8
property float x
property float y
property float z
element face 6
property list uchar int vertex_index
end_header
0 0 0
0 0 1
0 1 1
0 1 0
1 0 0
1 0 1
1 1 1
1 1 0
4 0 1 2 3
4 7 6 5 4
4 0 4 5 1
4 1 5 6 2
4 2 6 7 3
4 3 7 4 0
"""
[26]:
pp.pprint(parse_bytes(ply_header, ascii_example))
PlyHeader(format=<PlyFormat.ASCII: 1>, comment=['made by Greg Turk', 'this file is a cube'], elements=[PlyElement(name='vertex', size=8, properties=[PlyProperty(dtype=PlyPrimitiveType(dtype=dtype('float32')), name='x'), PlyProperty(dtype=PlyPrimitiveType(dtype=dtype('float32')), name='y'), PlyProperty(dtype=PlyPrimitiveType(dtype=dtype('float32')), name='z')]), PlyElement(name='face', size=6, properties=[PlyProperty(dtype=PlyListType(size_type=PlyPrimitiveType(dtype=dtype('uint8')), value_type=PlyPrimitiveType(dtype=dtype('int32'))), name='vertex_index')])])
No for the fun part! The header that we read actually encodes the parser for the rest of the file!
[27]:
pp.pprint(parse_bytes(ply_file, ascii_example))
{ 'data': { 'face': [ {'vertex_index': [0, 1, 2, 3]},
                      {'vertex_index': [7, 6, 5, 4]},
                      {'vertex_index': [0, 4, 5, 1]},
                      {'vertex_index': [1, 5, 6, 2]},
                      {'vertex_index': [2, 6, 7, 3]},
                      {'vertex_index': [3, 7, 4, 0]}],
            'vertex': [ {'x': 0.0, 'y': 0.0, 'z': 0.0},
                        {'x': 0.0, 'y': 0.0, 'z': 1.0},
                        {'x': 0.0, 'y': 1.0, 'z': 1.0},
                        {'x': 0.0, 'y': 1.0, 'z': 0.0},
                        {'x': 1.0, 'y': 0.0, 'z': 0.0},
                        {'x': 1.0, 'y': 0.0, 'z': 1.0},
                        {'x': 1.0, 'y': 1.0, 'z': 1.0},
                        {'x': 1.0, 'y': 1.0, 'z': 0.0}]},
  'header': PlyHeader(format=<PlyFormat.ASCII: 1>, comment=['made by Greg Turk', 'this file is a cube'], elements=[PlyElement(name='vertex', size=8, properties=[PlyProperty(dtype=PlyPrimitiveType(dtype=dtype('float32')), name='x'), PlyProperty(dtype=PlyPrimitiveType(dtype=dtype('float32')), name='y'), PlyProperty(dtype=PlyPrimitiveType(dtype=dtype('float32')), name='z')]), PlyElement(name='face', size=6, properties=[PlyProperty(dtype=PlyListType(size_type=PlyPrimitiveType(dtype=dtype('uint8')), value_type=PlyPrimitiveType(dtype=dtype('int32'))), name='vertex_index')])])}
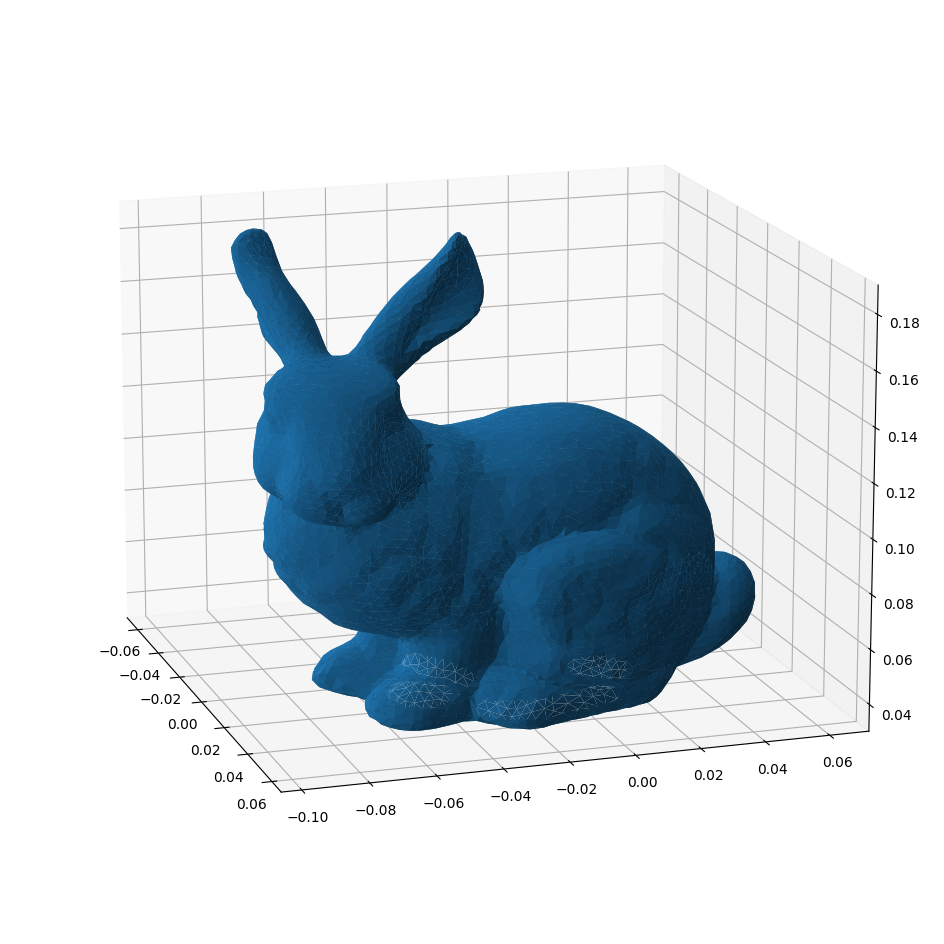
The Stanford Bunny
Now that we have the capability to parse binary PLY files, we can load the Stanford Bunny. For visualisation purposes it helps to know that all faces in this file are triangles.
[28]:
from pathlib import Path

bunny = parse_bytes(ply_file, Path("_static/stanford_bunny.ply").open(mode="rb").read())
[29]:
vertices = bunny["data"]["vertex"].view((np.float32, 3))
triangles = np.array([row["vertex_indices"] for row in bunny["data"]["face"]])
[30]:
from mpl_toolkits import mplot3d
from matplotlib import pyplot as plt
# For interactive use: install ipympl and run:
# %matplotlib widget
[31]:
fig = plt.figure(figsize=(12,12))
ax = plt.axes(projection="3d")
ax.azim = -18
ax.elev = 15
ax.plot_trisurf(*vertices.T[[2,0,1]], triangles=triangles);
Parsing Memory mapped OpenFOAM files
The final example is to read an OpenFOAM file as a memory mapped array. There are some details that need attention.
import mmap
import numpy as np
from byteparsing import parse_bytes
from byteparsing.openfoam import foam_file

f = Path("pipeFlow/1.0/U").open(mode="r+b")
with mmap.mmap(f.fileno(), 0) as mm:
  content = parse_bytes(foam_file, mm)
  result = content["data"]["internalField"]

  <<do work ...>>

  del result
  del content
The content is returned in the form of a nested dictionary. The "internalField" item is a name that one often finds in OpenFOAM files. The result object is a Numpy ndarray created using a np.frombuffer call. Any mutations to the Numpy array are directly reflected on the disk. This means that accessing large amounts of data can be extremely efficient in terms of memory footprint.
The final two del statements are necessary to ensure that no reference to the memory-mapped data outlives the memory map itself, which is closed as soon as we leave the with mmap ... context.